Skip to content

快速入门

MixCli是一个命令行应用开发框架,其主要是对commanderprompts的封装,提供了更加友好的命令行开发体验。

以下我们将通过一个典型的monorepo工程,来介绍如何使用MixCli开发命令行应用。

拟开发一个名为flex应用,该应用提供了@flex/cli,需要达成以下效果:

  • @flex/cli提供了名称为flex的命令
  • flex init用来初始化vuereactangular应用
  • flex dev用来启动开发应用
  • 开发者要使用flex时,只需要安装@flex/cli,然后: 如果要开发vue应用,则安装@flex/vue,则可以使用flex init创建vue应用开发 如果要开发react应用,则安装@flex/react,则可以使用flex init创建react应用开发 如果要开发angular应用,则安装@flex/angular,则可以使用flex init创建angular应用开发
  • 如果开发者没有安装@flex/cli@flex/react@flex/angular中的任意一个,则执行flex dev时会用户选择其中的一个,或者在命令行通过-t来传入。
  • 考虑到创建vuereactangular应用的相关逻辑的不一样,我们不希望将所有逻辑代码均放在@flex/cli中,而分别位于packages/vue,packages/react,packages/angular中。这样最大的优点在于,由于应用逻辑并不存在于@flex/cli@flex/cli仅是一个入口,所以@flex/cli可以保持稳定。

第1步:创建工程

首先创建一个monorepo工程,工程结构如下:

shell
flex
  |-- packages
    |-- cli     
    |-- vue
    |-- react
    |-- angular
  |-- package.json
flex
  |-- packages
    |-- cli     
    |-- vue
    |-- react
    |-- angular
  |-- package.json

示例工程名为flex,工程中的包名分别是@flex/cli@flex/angular@flex/vue@flex/react

第2步:创建命令行应用

@flex/cli是命令行应用,对外提供名称为flex的命令。

1. 安装依赖

bash
npm install mixcli
npm install mixcli
bash
pnpm add mixcli
pnpm add mixcli
bash
yarn add mixcli
yarn add mixcli

2. 创建cli.js

@flex/cli包中创建cli.js文件,内容如下:

flex
  |-- pacakges
    |-- cli
      |-- cli.js
      |-- init.js
      |-- package.json
flex
  |-- pacakges
    |-- cli
      |-- cli.js
      |-- init.js
      |-- package.json

主要内容如下:

ts
const { MixCli } = require("mixcli") 

const cli = new MixCli({
    name: "flex",
    version: "1.0.0",
    include: /^\@flex\//,  
    logo: String.raw`
        ____   ____                  __            
        \   \ /   /___   ___________|  | _______   
         \   Y   /  _ \_/ __ \_  __ \  |/ /\__  \  
          \     (  <_> )  ___/|  | \/    <  / __ \_
           \___/ \____/ \___  >__|  |__|_ \(____  /
                            \/           \/     \/`, 
})
cli.run()
json
{
  "name": "@flex/cli",
  "version": "1.0.0",
  "bin": {
    "flex": "cli.js"
  }
}
{
  "name": "@flex/cli",
  "version": "1.0.0",
  "bin": {
    "flex": "cli.js"
  }
}

@flex/cli仅仅是一个命令行的入口:

  • 重点:include: /^\@flex\// 的意思是告诉mixcli,当执行flex命令时,会在当前工程中搜索以@flex/开头的包,然后包中声明在cli文件夹下的所有命令被合并到flex命令中。
  • 上面所说的当前工程指的是安装了@flex/cli的工程,而不是我们的示例工程。
  • @flex/cli中使用cli.register(initCommand),注册一个通用的init命令,该命令的实现在init.js中。 一般可以在此工程提供一些通用命令,而其他的命令声明逻辑在分别在@flex/*/cli/*.js等包中实现。

第3步: 创建init命令

接下来,我们在@flex/cli中创建一个init命令。

bash
flex
 |-- pacakges
    |-- cli
       |-- cli.js
       |-- init.js   
       |-- package.json
flex
 |-- pacakges
    |-- cli
       |-- cli.js
       |-- init.js   
       |-- package.json

编写packages/cli/init.js文件,内容如下:

js
const { MixCommand } = require('mixcli');

/**
 * @param {import('mixcli').MixCli} cli
 */
module.exports = (cli)=>{                
    const initCommand = new MixCommand("init");
    initCommand
        .description("创建应用")         
        .option("-t, --type <type>", "应用类型",{choices:["vue","react","angular"]})
        .action((options)=>{            
            console.log("Run init:",options.type)
        })
    return initCommand
}

然后,我们在packages/cli/index.js中注册init命令。

js
const { MixCli } = require("mixcli") 
const initCommand = require("./init")  
const cli = new MixCli({
    name: "flex",
    include: /^\@flex\//,  
    //...
})
cli.register(initCommand)
cli.run()
const { MixCli } = require("mixcli") 
const initCommand = require("./init")  
const cli = new MixCli({
    name: "flex",
    include: /^\@flex\//,  
    //...
})
cli.register(initCommand)
cli.run()

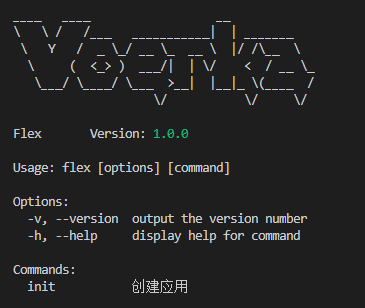
现在执行flex命令,可以看到init命令已经被注册到flex命令行中了。

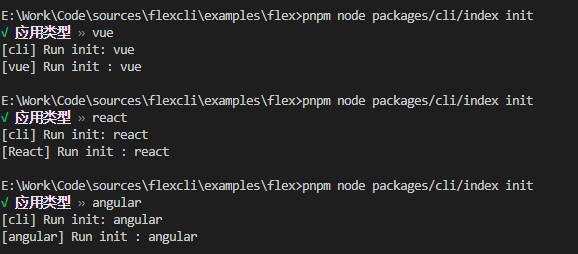
如果运行flex init,则会执行init命令就会自动提示用户选择,然后执行action函数。

第4步:命令选项分布式处理

在本例中,我们为init命令设计了["vue","react","angular"]三个选项。

  • 常规处理方式

常规情况下,我们会按照如下方式处理命令选项:

js
// packages/cli/init.js
const { MixCommand } = require('mixcli');
module.exports = (cli)=>{                
    const initCommand = new MixCommand("init");
    initCommand
        .description("创建应用")         
        .option("-t, --type <type>", "应用类型",{choices:["vue","react","angular"]})
        .action((options)=>{            
            if(optins.type === "vue"){
                // ...
            }else if(optins.type === "react"){
                // ...
            }else if(optins.type === "angular"){
                // ...
            }
        })
    return initCommand
}

这种处理方式下,我们需要在@flex/cli中包含所有的vue/react/angular处理逻辑的代码,这样会导致@flex/cli包变得臃肿并且不易维护。

更好的处理方式是,将处理逻辑分别放在@flex/vue/cli/init.js@flex/react/cli/init.js@flex/angular/cli/init.js中。

  • 分布式处理方式

MixCli提供了这样的分布式处理命令选择的能力。

我们分别在@flex/vue/cli/init.js@flex/react/cli/init.js@flex/angular/cli/init.js中实现init命令的处理逻辑。

js
const { MixCommand,BREAK } = require('mixcli');
module.exports = (cli)=>{                
    cli.find("init").then(initCommand=>{
      initCommand
          .action((options)=>{      
              if(options.type === "vue"){     
                console.log("[vue] Run init :",options.type)
                return BREAK
              }
          })
    });        
}
js
const { MixCommand,BREAK } = require('mixcli');
module.exports = (cli)=>{                
    cli.find("init").then(initCommand=>{
      initCommand
          .action((options)=>{      
              if(options.type === "react"){     
                console.log("[react] Run init :",options.type)
                return BREAK
              }
          })
    });        
}
js
const { MixCommand,BREAK } = require('mixcli');
module.exports = (cli)=>{                
    cli.find("init").then(initCommand=>{
      initCommand
          .action((options)=>{      
              if(options.type === "angular"){     
                console.log("[angular] Run init :",options.type)
                return BREAK
              }
          })
    });        
}
  • src/cli目录下创建init.js文件,用于声明init命令。cli目录下的所有js文件会被自动加载,每个文件均导出一个函数,该函数需要返回一个或多个MixCommand实例。cli目录是一个默认的约定目录,可以通过cli.cliDir参数修改。
  • 创建MixCommand实例,用于声明命令。MixCommand继承自commanderCommand类,因此可以使用commander的所有特性。
  • package.json只需要将mixcli添加为依赖即可。

第5步: 开发子命令

以上是分布式处理命令选项的方式,MixCli也支持创建子命令。

以下在@flex/vue中创建init vue子命令。

js
// @flex/vue/cli/create_vue.js
const { MixCommand } = require('mixcli'); 
module.exports = (cli)=>{                

    cli.find("init").then((initCommand)=>{
      const initVueCommand = new MixCommand("vue");
        initVueCommand
          .description("创建Vue应用")  
          .option("-a, --app <value>", "应用名称",{validate:(value)=>value.length>5})})                           
          .action((options)=>{            
              console.log("创建Vue应用:",options.app)
          })
      initCommand.addCommand(initVueCommand)  
    })    
}

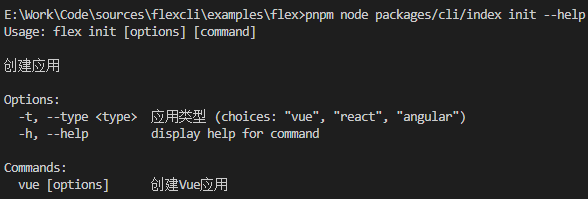
然后当执行flex init vue时,会看到如下输出:

此时执行flex init --help可以看到vue子命令的帮助信息:
第6步: 自动推断交互提示

接下来我们创建一个dev命令, 用于启动开发服务器,展示交互提示。

js
const { MixCommand } = require('mixcli');

/**
 * @param {import('mixcli').MixCli} cli
 */
module.exports = (cli)=>{                
    const devCommand = new MixCommand("dev");
    devCommand
        .description("开发模式")          
        // 指定了默认值且强制提示
        .option("--count <value>","数量",{default:5,prompt:true})
        // 没有指定默认值,使用,分割多个值
        .option("-r,--routes <value...>","路由(多个值采用,分割)")                           
        // 指定了默认值时不进行提示
        .option("-p,--port <port>","指定端口号",3000)                      
        // 有默认值且强制显示提示
        .option("-d,--debug" ,"调试模式",{ default:true,prompt:true })      
        .option("--color <value...>","显示颜色",{choices:["red","yellow","blue"],prompt:"multiselect"})  
        // 未指定默认值,使用自动完成,可以输入任意值
        .option("--filter <value>","文件过滤",{choices:["src","test","debug"],prompt:"autocomplete"})    
        .option("-h,--host <host>","指定主机名",{default:"localhost",prompt:true})                            // 自动提示(没有输入且无默认值时)
        // 始终不进行提示取,取决env是可选还是必选
        .option("-e,--env [value]","环境变量",{ prompt:false })                                   
        .option("-m,--mode <mode>","指定模式",{choices:["development","production","test","debug"]})
        .option("-f,--framework [value]","开发框架",{choices:[
            {title:"vue",value:1},
            {title:"react",value:2,description:"默认"},
            {title:"angular",value:3}
        ]})
        .option("-o,--open","自动打开浏览器",{prompt:{          // 自定义提示
            type:"toggle",
            message:"是否自动打开浏览器?",
        }})
        .action((options)=>{            
            console.log("        run dev app")
            console.log("dev app",options)
        })
    return devCommand
}
js
const { MixCli } = require("mixcli") 
const initCommand = require("./init") 
const devCommand = require("./dev")
const cli = new MixCli({
    name: "flex",
    version: "1.0.0",
    include: /^\@flex\//,  

})
cli.register(initCommand)
cli.register(devCommand)
cli.run()
const { MixCli } = require("mixcli") 
const initCommand = require("./init") 
const devCommand = require("./dev")
const cli = new MixCli({
    name: "flex",
    version: "1.0.0",
    include: /^\@flex\//,  

})
cli.register(initCommand)
cli.register(devCommand)
cli.run()

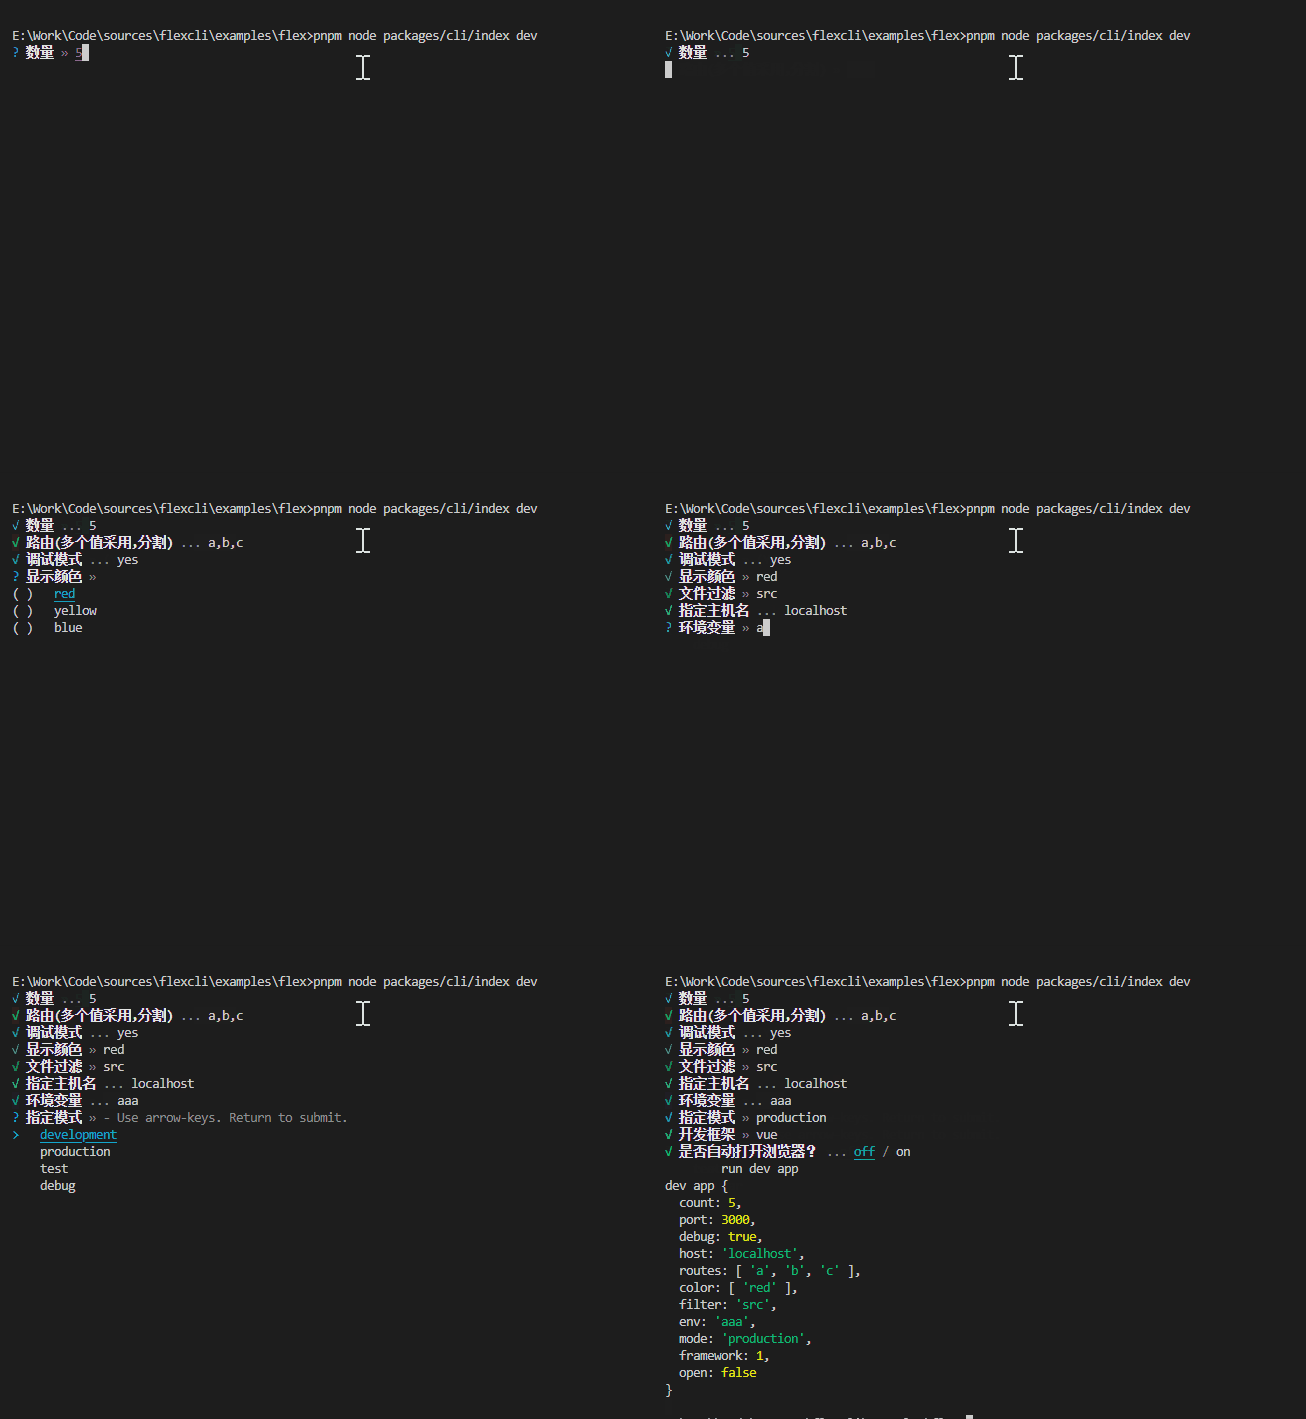
当执行flex dev时,会看到如下输出:

图片

  • 命令行的交互体验与使用commander时完全一样
  • 仅当选项未指定默认值或满足一定条件时,才会根据一定的规则自动推断交互提示类型。详见自动推断交互提示
  • MixCli使用prompts来实现交互提示,因此支持prompts的所有交互类型特性。详见prompts

第7步: 开发命令

最后就是开发命令了,此时轮到开源工具库logsets上场了。

logsets是一个终端增强显示组件,用来在终端中显示表格、列表、树形结构等数据,提供更好友好的终端交互体验。

以下是logsets的使用示例:

js
const { MixCommand } = require('mixcli');

 
module.exports = (cli)=>{                
    const devCommand = new MixCommand("dev");
    devCommand
        .description("开发模式")          
        .action(async ()=>{
            const tasks = logsets.createTasks([
              {
                  title:"任务处理被停止",
                  execute:async ()=>{
                      await delay(100)
                      return "abort"
                  }
              },
              {
                  title:"开始扫描文件",
                  execute:async ()=>{await delay(100);return 1}            
              },
              {   title:"准备对文件进行预处理",
                  execute:async ()=>{throw new Error("已安装")}, 
              },
              {   title:"准备对文件进行预处理",
                  execute:async ()=>{
                      await delay(100)
                      return "已完成"
                  }
              },
              {   title:"执行过程中显示进度",
                  execute:async ({task})=>{
                      for(let i=0;i<100;i++){
                          await delay(100)
                          task.note(i+"%")
                      }
                  }
              },
              {
                  title:"读取文件并编译成exe文件",
                  execute:async ()=>{
                      await delay(100)
                      return ['stop',"不干了"]
                  }            
              },        
              {
                  title:"任务处理被停止",
                  execute:async ()=>{
                      await delay(100)
                      return ["abort",'真的不干了']
                  }
              },
              "-",
              {
                  title:"任务执行失败",
                  execute:async ()=>{throw new Error("TimeOut")},
                  error:["ignore","忽略:{message}"]
              },
              {
                  title:"任务待办状态",
                  execute:async ()=>{throw new Error("TimeOut")},
                  error:"出错了"
              },    
              "出错处理",
              {
                  title:["下载文件:{},大小:{}, 已下载{}","package.json",122,344],
                  execute:async ()=>{throw new Error("TimeOut")},
                  error:"出错了:{message}"
              },
              {
                  title:["下载文件:{},大小:{}, 已下载{}",["package.json",122,344]],
                  execute:async ()=>{throw new Error("TimeOut")},
                  error:()=>"X"
              },
              {
                  title:["下载文件:{},大小:{}, 已下载{}",["package.json",122,344]],
                  execute:async ()=>{throw new Error("TimeOut")},
                  error:()=>"skip"
              },      
          ],{ignoreErrors:true})
          try{
              let results = await tasks.run(["开始执行{}任务",5])
              console.log(results)            
          }catch(e){
              console.error(e)
          }
    })

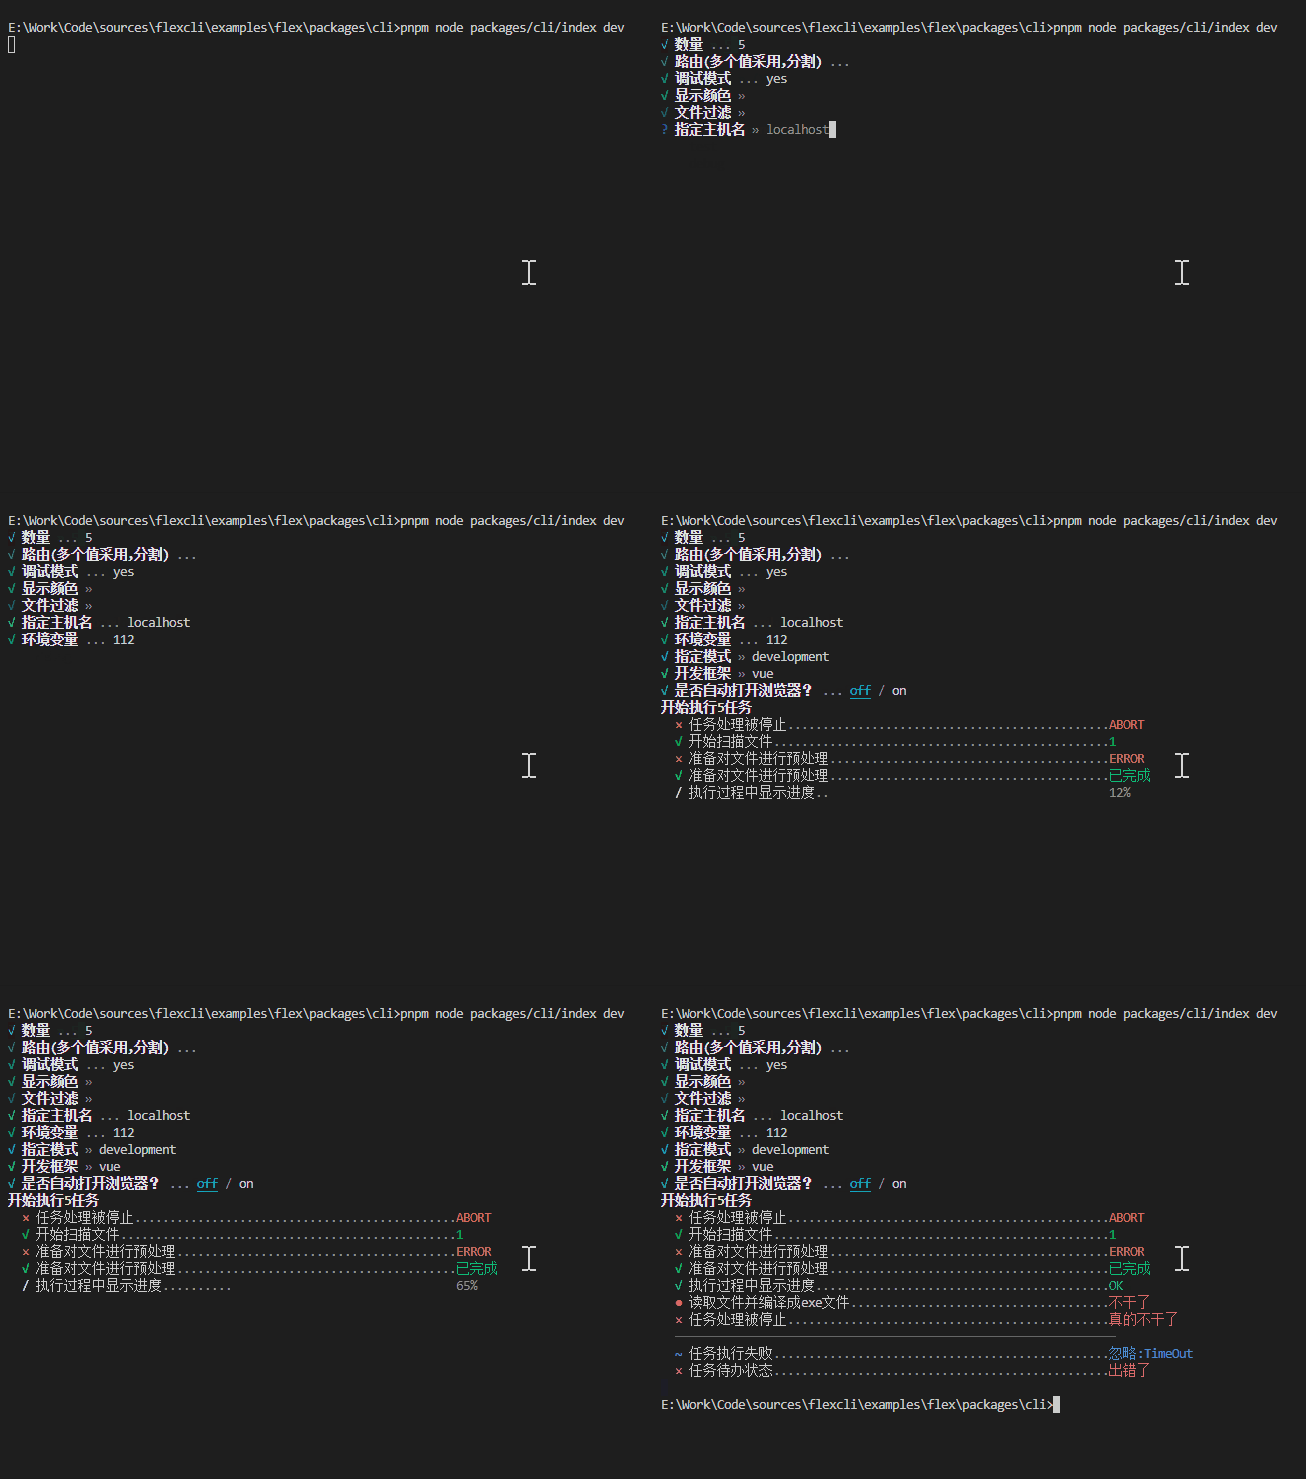
执行flex dev,会看到如下输出:

图片

更多的logsets使用示例,请参考logsets

小结

  • MixCli是一个基于commander的命令行工具开发框架,提供了一套命令行开发的最佳实践。
  • MixCli能对所有命令行选项自动推断交互提示类型,当用户没有输入选项时,会自动引导用户输入选项,提供友好的用户体验。
  • MixCli可以在当前工程自动搜索满足条件的包下声明的命令进行合并,从而实现扩展命令的目的。此特性可以保持@flex/cli包的精简和稳定,给用户一致的体验。